The platform-independent Eclipse RCP architecture makes rich-client applications easy to write as the business logic is organized into reusable components called plugins. In this article, We are going to convert Mylyn 2.2 Release Plugin to a standalone RCP application. I choose Mylyn because it is one of the most popular eclipse plugin known to all. I assume that Eclipse IDE is already installed and running. I have used Eclipse Europa 3.3.0 in this tutorial.
1.Firstly we need to get the Mylyn 2.2 Release plugin and install it in our eclipse IDE. There are two different ways to have it done. One is to install the Plugin from eclipse itself using the Software update option. The procedure is nicely illustrated here.
Second method is to install the plugin manually. For that get the Mylyn 2.2 Release archive from here.
Uncompress it and copy the contents of plugin directory to the eclipsebasedir/plugin and contents of features directory to the eclipsebasedir/features.
2.We need to restart the Eclipse IDE for the newly added plugins to work. For that close the eclipse IDE if it is already running and start it cleanly. We will use eclipse.exe -clean from command prompt in windows or eclipse -clean from shell prompt in Linux.
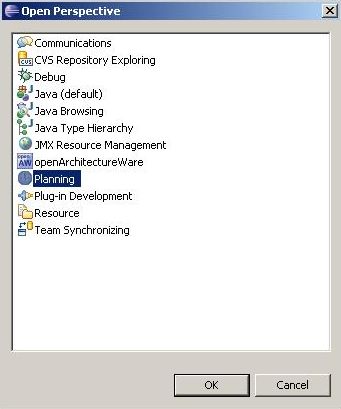
3.Now we need to Verify that the newly added mylyn plugin is working in our Eclipse IDE. Mylyn uses a perspective called “Planning”.In Eclipse, a perspective is a way to organize and view the files associated with our program. We can open the perspective from Window -> Open Perspective -> Other
We will select the perspective “Planning” and continue by clicking the Ok button.
Now Eclipse has opened the “Planning” perspective for us which shows a Task List view. To verify that the plugin is working properly, we can create a new Task using the New Wizard. For that Go to File ->New ->Task
A New Task will be opened for us and it will be listed in the Task List as shown below.

Now we have verified that the mylyn plugin is working properly. It is time to move on to our actual goal ie. Converting this Plugin to a standalone RCP application.
5.We start by creating a new Plugin project in eclipse using the New wizard.
For that go to File-> New-> Project

We will select Plugin Project and continue by clicking next.

6.We need to fill in a suitable name for our project for eg.“mylyn” and continue by clicking next.

7.In the next Screen we will see an option “would you like to create a Rich Client Application “ with radio buttons “Yes” or “NO”. Since we are going to create a Rich Client Application enable it by selecting “Yes” and continue by clicking the Next button.

8.Now Eclipse will show us a list of available Templates for our RCP. We will take the simplest of all “Hello RCP” template. Firstly we will enable “Create a plugin using one of the templates” by clicking the checkbox. We will select “Hello RCP” and continue by clicking Next. Please note “Hello RCP” is the simplest template available to which we add only those components that our application needs.

9.In the next screen Eclipse will allow us to name our application. Give an appropriate name
eg. “Mylyn Application”.This name comes on the title bar of our application. Give an appropriate package name too. I have used “mylyn” in this tutorial. Branding is an option provided by eclipse to brand our application. Branding includes adding splash image,custom icons etc. Enable branding as we will be branding our application in the final stage. Move on by clicking Finish.

If you had followed with me in this tutorial, eclipse will be in “Planning perspective” and will prompt to switch to “Plugin-in Development perspective”. Please select “yes” at this prompt.

6.Eclipse creates the Project for us and opens up the manifest file as shown below.

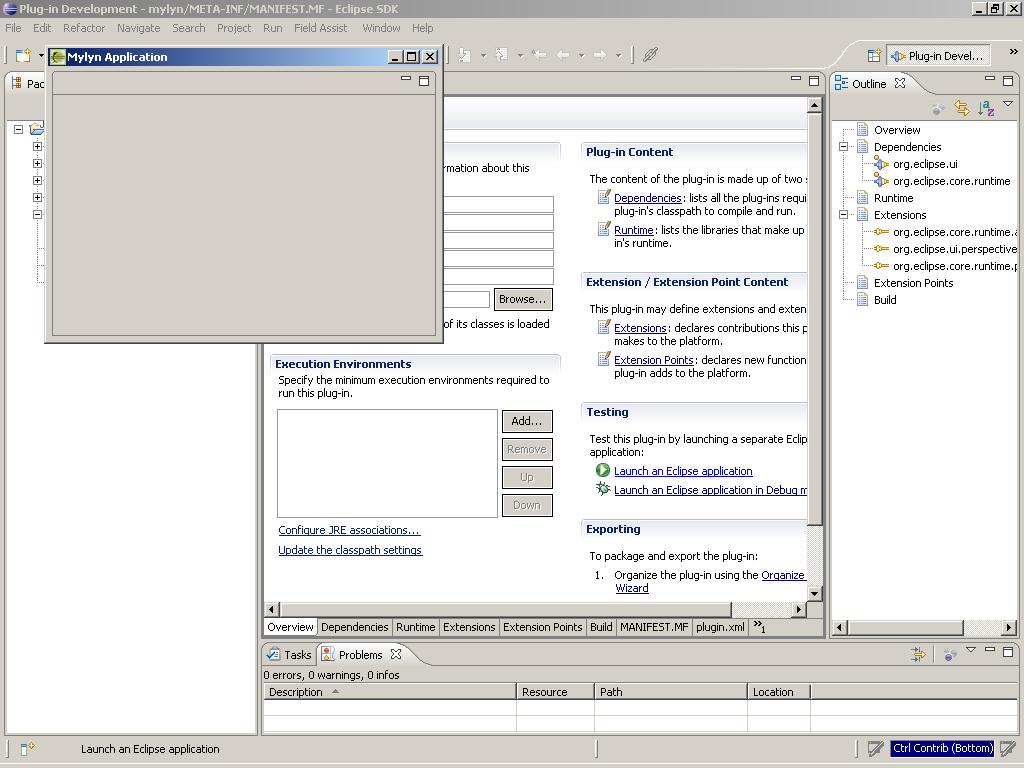
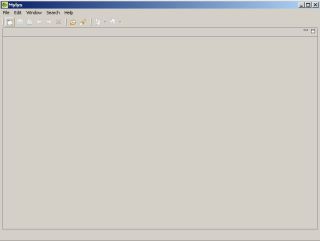
7.So far we have created an RCP application using the “Hello Template” and its time to see for ourself how it looks like. We can start the application from eclipse by Clicking the “Launch an Eclipse Application” link present in the manifest file. The application pops up as shown below. This is the basic building block of our Mylyn RCP application and we will add features to it in an iterative manner.
8.We can notice that the application screen area is small. This is because by default the size is set to (400,300) in a method preWindowOpen() inside ApplicationWorkbenchWindowAdvisor class.We will open up the ApplicationWorkbenchWindowAdvisor .java and set it to (800,600). Change the setShowCoolBar value to true as we will be adding some Coolbar menus to spice up our application.

9.Right now our application is a plain template. There are no menus or icons or Actions. Eclipse allows us to define and declare all the actions/menus that we need in our RCP application. All these are to be done in ApplicationActionBarAdvisor class. So we will open this file and define all the menus/actions/sub menus etc that we want for our entry level application programaticaly.

So after adding all the Actions/Menus etc we want for our Mylyn application, our ApplicationActionBarAdvisor.java looks like as shown below.
package mylyn;
import org.eclipse.core.runtime.IExtension;
import org.eclipse.jface.action.IContributionItem;
import org.eclipse.jface.action.ICoolBarManager;
………
public class ApplicationActionBarAdvisor extends ActionBarAdvisor {
//Declaring all the Workbench Actions
private IWorkbenchAction newAction;
private IWorkbenchAction saveAction;
private IWorkbenchAction openPerspective;
………….
public ApplicationActionBarAdvisor(IActionBarConfigurer configurer) {
super(configurer);
protected void makeActions(IWorkbenchWindow window) {
//All the actions are defined here.
newAction=ActionFactory.NEW.create(window);
newAction.setText(“New”);
register(newAction);
saveAction=ActionFactory.SAVE.create(window);
register(saveAction);
openPerspective= ActionFactory.OPEN_PERSPECTIVE_DIALOG.create(window);
register(openPerspective);
…………..
}
protected void fillCoolBar(ICoolBarManager coolBar) {
//Adding the Actions to the CoolBar.
IToolBarManager toolbar = new ToolBarManager(SWT.FLAT | SWT.RIGHT);
coolBar.add(new ToolBarContributionItem(toolbar, “main”));
toolbar.add(newAction);
toolbar.add(saveAction);
………….
}
protected void fillMenuBar(IMenuManager menuBar) {
//Adding the Actions to the Menu Bar.
MenuManager fileMenu = new MenuManager(“&File”,IWorkbenchActionConstants.M_FILE);
menuBar.add(fileMenu);
MenuManager windowMenu= new MenuManager(“&Window”,IWorkbenchActionConstants.WINDOW_EXT);
menuBar.add(windowMenu);
………….
fileMenu.add(newAction);
fileMenu.add(new Separator(IWorkbenchActionConstants.MB_ADDITIONS));
fileMenu.add(new Separator());
fileMenu.add(saveAction);
windowMenu.add(openPerspective);
………….
}
}
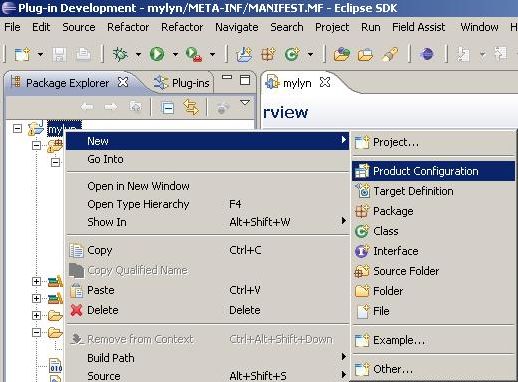
10.So we have completed adding the Menus/Actions for our application and it is time to define a product Configuration for our mylyn project. A product configuration is required to brand or package our final application. Product configuration manages information about splash screens,launcher icons,about text, plugin and features list,window images etc together for our application. To create a product configuration right click the mylyn project Go to New-> Product Configuration as shown below.
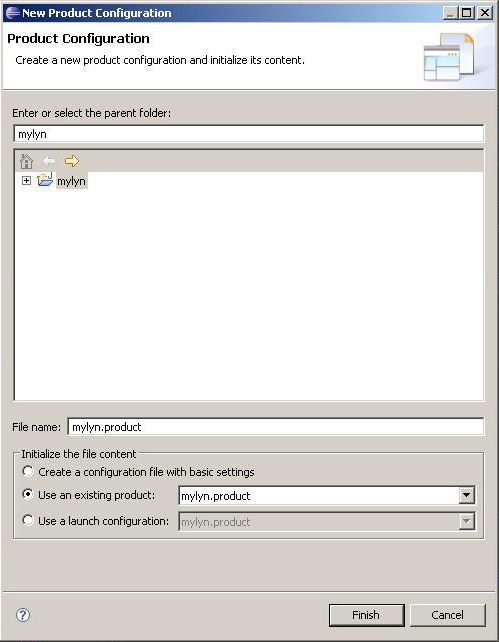
11.We need to give a name for the product configuration eg.“mylyn.product” and continue by clicking finish.
12.Eclipse will open the Product configuration file in a manifest editor for us. We can notice that eclipse has automatically selected “mylyn.application” as the application to run on launching this product. If it is not, select the same from the drop down menu.
13. So far so good. We need to check whether the application is working from our product configuration. For that click “Launch an Eclipse application” link in the product configuration file which will pop up the application. Make sure all the menus that we added in step 9 shows up but these menus wont work unless we include all the necessary Plugins. We can notice that the application comes up in (800*600) mode.
14.Now its time for us to include all the necessary mylyn Plugins and Fragments to our product configuration. We will do that by clicking the Configuration tab in the Product configuration file. We can see that all the plugins and fragments required for the basic application from template are already shown here.

15.For adding the mylyn Plugins and fragments to the product configuration, we will Click the add button which brings up a pop up list of Plugins and fragments. We need to scroll down and select only those mylyn Plugins which are required. Click the Ok button to continue. Now we need to resolve the plugin dependencies. Click “Add Required Plugins” link and eclipse will automatically add the dependencies for us. We need to save the project for the changes to take effect.

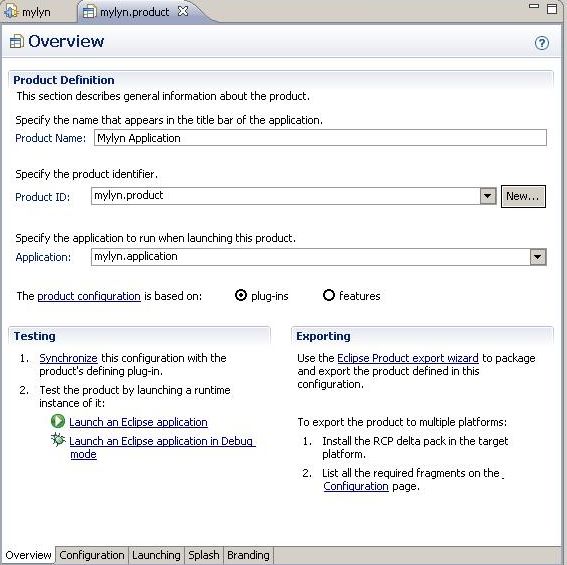
16.So far we have created a base application,defined the menus/actions, defined a product configuration, added the mylyn Plugins and fragments, resolved the dependencies. Now its time for us to check whether everything plug-in well and works well together. For that we need to get back to the “overview” Tab. We need to Click the Synchronise link. This ensures that all the changes that we have made in the product configuration and the mylyn.application synchronize with each other. We can start the application by clicking “Launch an Eclipse application” link present in product configuration.

17.We can see that the Mylyn Application starts in a new window. We can check whether the perspective “planning”,the views,creating a new task etc work successfully following the same procedure we have done in step 3.

18.We need to give a name for our application launcher and provide custom icons for our application. Eclipse provides a variety of tools to get it done. In the product Configuration click the “Launching Tab”. Give a Launcher name eg.“mylyn” and click save. We can provide the icon files required for branding here.(Note:-I have not done this below)

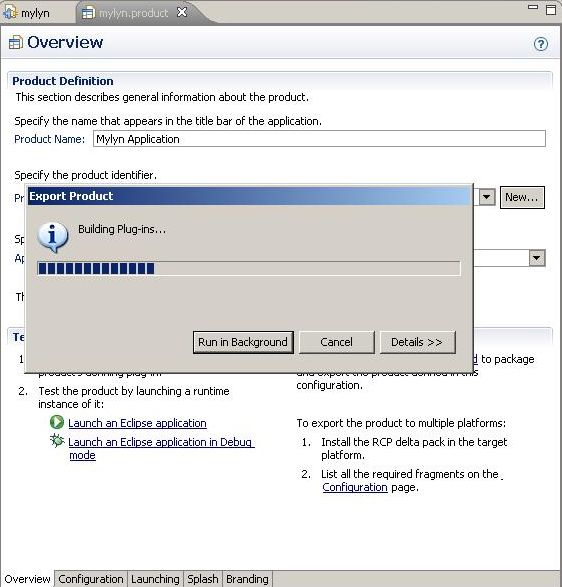
19.We want a standalone mylyn RCP application. So we will Export the application from our eclipse environment to our operating system’s directory structure. For doing this, in the product configuration file click “Eclipse Product Export wizard” which will bring up a pop up. We want the Root directory to be called “mylyn” and not the default name “eclipse”.Change the root directory name to “mylyn”,make sure the “synchronization” checkbox is checked. Browse through the directory structure to the folder to which we want to export the application and click finish to export.

20.Eclipse will export the application for us and if it is successful no errors will be thrown in the eclipse error log or problems view.
21.So everything done and its time for us to check out the final application. Browse through the directory structure to the folder to which we exported the application. We can start the application by clicking mylyn.exe. Make sure everything works creating a task,the views the planning perspective etc. Final application screen shot is shown below.

So thats it. We have successfully completed converting mylyn plugin to a standalone RCP application.
Please note the full code of https://applicationactionbaradvisor.java/ can be obtained from here.
I hope this post would help some one.Please feel free to leave comments/Suggestions/Correct me.
HTH,
Anoop Menon
Confianz Global® is an open source Software Development company that provides custom Odoo Implementation, integration and customization with 24/7 support.