


Today we will see a brief walkthrough on how to use Google Maps with Flutter, using the official google_maps_flutter plugin that is provided by the Flutter team itself. Normally using Flutter plugins are quite straightforward and require only a package install with maybe configuring some things at the native level code. However, in this article we will try to implement some of the APIs available in the package and see how it can be used in practice.
As always, we will start from scratch by creating a new Flutter project and then adding the google_maps_flutter package. A caveat to using this package is that since we are working with Google Maps in the app, we would need a Google Maps API key. For that, you will have to create a project on Google Cloud Platform and enable the maps API. This will require using your credit card or some other form of payment registration, but it will provide free usage of Google Maps up to $200, which should be more than enough for our purposes. For more info on this check out the official Google Maps documentation (https://developers.google.com/maps/gmp-get-started).
After setting up the project and getting our API key, we can start by creating a new project and installing the package using flutter pub get google_maps_flutter. As mentioned before, we will need to make some changes in the native level code which are detailed below.
For Android:
- Set the minSdkVersion in android/app/build.gradle to 20
android {
    defaultConfig {
        minSdkVersion 20
    }
}
2. Specify the API key that you got from the Google Cloud console for Maps in android/app/src/main/AndroidManifest.xml file
<manifest ...
<application ...
<meta-data android:name="com.google.android.geo.API_KEY"
android:value="YOUR KEY HERE"/>
For iOS:
Specify the API key for Google maps in the AppDelegate file as shown below.
- For Objective C
#include "AppDelegate.h"
#include "GeneratedPluginRegistrant.h"
#import "GoogleMaps/GoogleMaps.h"

@implementation AppDelegate

- (BOOL)application:(UIApplication *)application
didFinishLaunchingWithOptions:(NSDictionary *)launchOptions {
[GMSServices provideAPIKey:@"YOUR KEY HERE"];
[GeneratedPluginRegistrant registerWithRegistry:self];
return [super application:application didFinishLaunchingWithOptions:launchOptions];
}
@end
2. For Swift
import UIKit
import Flutter
import GoogleMaps

@UIApplicationMain
@objc class AppDelegate: FlutterAppDelegate {
  override func application(
    _ application: UIApplication,
    didFinishLaunchingWithOptions launchOptions: [UIApplication.LaunchOptionsKey: Any]?
  ) -> Bool {
    GMSServices.provideAPIKey("YOUR KEY HERE")
    GeneratedPluginRegistrant.register(with: self)
    return super.application(application, didFinishLaunchingWithOptions: launchOptions)
  }
}
To proceed, we will set up the Maps at the home page itself. The google_maps_flutter package should expose a GoogleMaps widget which we should be able to use to view the map.
import 'package:flutter/material.dart';
import 'package:google_maps_flutter/google_maps_flutter.dart';

void main() => runApp(MyApp());

class MyApp extends StatelessWidget {
  @override
  Widget build(BuildContext context) {
    return MaterialApp(
      title: 'Flutter Google Maps Demo',
      home: MapPage(),
    );
  }
}


class MapPage extends StatefulWidget {
  @override
  State createState() => MapPageState();
}


class MapPageState extends State {
  static final CameraPosition _initialCameraPosition = CameraPosition(
    target: LatLng(35.22690877158998, -80.84422853576228),
    zoom: 16,
  );

  @override
  Widget build(BuildContext context) {
    return Scaffold(
      body: Stack(
        children: [
          GoogleMap(
            mapType: MapType.normal,
            initialCameraPosition: _initialCameraPosition,
            onMapCreated: (GoogleMapController controller) {
              _controller.complete(controller);
            },
            zoomControlsEnabled: false,
          ),
        ],
      ),
    );
  }
A few things we need to notice here are:
- We need to specify the initial position to be shown on the map when it is initialized. Normally, we would make it use the current position of our device but for right now we can hard code a random position.
- The onMapCreated property is not required per se for working on the widget, but we will need a reference to the GoogleMapController instance after the map is initialized for using other features of the maps such as markers and polylines.
- The GoogleMaps widget is wrapped by Stack, since we will be adding some buttons over the map. Therefore, the zoom controls are also disabled since we won’t be using that.
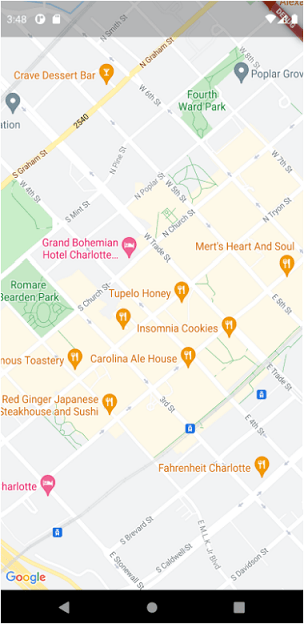
The above code should produce a result as shown below. You can interact with it as you normally would with Google Maps.
We can start working on the app and some of the features of the package. Basically, we will implement a route tracer where we will mock the movement of the device by generating random latitude and longitudes and then drawing a polyline following the route.
We will first add our current location as a class variable.
LatLng _currentLatLng = LatLng(35.22690877158998, -80.84422853576228);
Then we can create a function to change the camera position to a new location. This can be achieved by accessing the GoogleMapsController we had a reference to and using the animateCamera method in it which has to be provided with a CameraUpdate object initialized with the new CameraPosition.
Future updateCameraLocation() async {
    final GoogleMapController controller = await _controller.future;
    final CameraPosition _newCameraPosition =
        CameraPosition(target: _currentLatLng, zoom: 16);

    controller.animateCamera(CameraUpdate.newCameraPosition(_newCameraPosition));
  }
We can now create and wire up a button that starts creating mock locations. This is achieved by creating a repeating timer which will change the _currentLatLng with a new set of randomized latitude and longitude and trigger the updateCameraLocation function to reflect the change in the map.
We will also create a couple of class variables. One is a boolean variable called isMoving which is initialized to false. This will be used to identify whether we are updating the location and hence start or stop it. The base logic for this is shown below. The other variable called randomMovementTimer is used to store reference to the timer to cancel it later on. The timer is created when we want to simulate random movement.
ElevatedButton(
  style: ElevatedButton.styleFrom(
    primary: isMoving ? Colors.red : Colors.blue,
  ),
  child: Text(isMoving ? 'Stop' : 'Start'),
  onPressed: () {
    setState(() {
      isMoving = !isMoving;
    });

    if (isMoving) {
      randomMovementTimer =
          Timer.periodic(Duration(seconds: 4), (timer) {
        _currentLatLng = LatLng(
            _currentLatLng.latitude + getRandomNumber(),
            _currentLatLng.longitude + getRandomNumber());
        updateCameraLocation();
      });
    } else {
      randomMovementTimer?.cancel();
    }
  },
),
Here the _currentLatLng is updated with a new LatLng object which increments its latitude and longitude by a random decimal number. This is calculated with the helper function getRandomNumber().
double getRandomNumber() {
    final random = Random();
    double number = random.nextDouble() / 1000;
    return random.nextBool() ? number : 0 - number;
}
That should wrap up our location mocking logic. If you click the start button now, the app should change locations every 4 seconds.
Adding a polyline (route trace)
Now we can see how we can use the polylines available in the package to draw lines that trace the changes in the location.
For this we will need to add the _polyline property to the GoogleMap widget. This will have to be initialized with a set of Polyline objects and each of these Polyline objects will be initialized with a list of LatLng points and identified by a PolylineId.
So basically we will initialize a class variable of type Set<Polyline> with a single Polyline object with our initial coordinates. The ID of Polyline can simply be any unique string, here we will use the stringified version of our initial LatLng object. Furthermore, we will also add another variable called latLngList which tracks each location change so that we can get a continuous line when we create the polylines. This list will also be initialized with our initial coordinates.
Set _polyline = {
    Polyline(
      polylineId: PolylineId(LatLng(35.22690877158998, -80.84422853576228).toString()),
      points: [
        LatLng(35.22690877158998, -80.84422853576228)
      ],
width: 2
    )
  };

List latLngList = [LatLng(35.22690877158998, -80.84422853576228)];
The polyline property of the GoogleMap widget now needs to be set to the _polyline variable we defined.
...
GoogleMap(
  mapType: MapType.normal,
  initialCameraPosition: _initialCameraPosition,
  polylines: _polyline,
  onMapCreated: (GoogleMapController controller) {
    _controller.complete(controller);
  },
  zoomControlsEnabled: false,
),
...
We can now change the updateCameraLocation function defined before to add a new polyline to our _polyline set.
Future updateCameraLocation() async {
    final GoogleMapController controller = await _controller.future;
    latLngList.add(_currentLatLng);

    setState(() {
      _polyline.add(Polyline(
          polylineId: PolylineId(_currentLatLng.toString()),
          points: latLngList,
          width: 2));
    });

    final CameraPosition _newCameraPosition =
        CameraPosition(target: _currentLatLng, zoom: 16);

    controller.animateCamera(CameraUpdate.newCameraPosition(_newCameraPosition));
}
Note that we are wrapping the polyline addition within a setstate so as to reflect the updated UI (i.e. the line on the map).
This should wrap up our simple implementation of a route tracer. But let’s try extending the app a bit more using some other APIs available in the package, perhaps placing markers on our path.
Adding markers
Implementing markers also follows a very similar logic as creating polylines. It basically involves creating a set of Marker objects each with a unique MarkerId and a LatLng coordinate to display the marker.
We will integrate the marker logic by adding another button which allows us to drop a marker at that point. And as for the marker ID, it would be the same as before (i.e. we will use a stringified version of the currentLatLng object). So as before we will add a private class variable to store the markers called _markers and assign it to the markers property of the GoogleMap widget.
...
GoogleMap(
  mapType: MapType.normal,
  initialCameraPosition: _initialCameraPosition,
  polylines: _polyline,
  markers: _markers,
  onMapCreated: (GoogleMapController controller) {
    _controller.complete(controller);
  },
  zoomControlsEnabled: false,
),
...
Now we can write a function that will drop a marker at the currentLatLng by adding it to _markers.
void _dropMarkerAtCurrentLocation() {
    setState(() {
      _markers.add(Marker(
        markerId: MarkerId(_currentLatLng.toString()),
        position: _currentLatLng,
        icon: BitmapDescriptor.defaultMarker,
      ));
    });
  }
Then we can create a button and wire up this function in the stack as shown.
ElevatedButton(
onPressed: _dropMarkerAtCurrentLocation,
child: Text('Drop Marker'),
)
This should wrap our simple application. The final code for the entire implementation should look like this:
import 'dart:async';
import 'dart:math';

import 'package:flutter/material.dart';
import 'package:google_maps_flutter/google_maps_flutter.dart';

void main() => runApp(MyApp());

class MyApp extends StatelessWidget {
  @override
  Widget build(BuildContext context) {
    return MaterialApp(
      title: 'Flutter Google Maps Demo',
      home: MapPage(),
    );
  }
}

class MapPage extends StatefulWidget {
  @override
  State createState() => MapPageState();
}

class MapPageState extends State {
  Completer _controller = Completer();
  Timer? randomMovementTimer;
  bool isMoving = false;

  static final CameraPosition _initialCameraPosition = CameraPosition(
    target: LatLng(35.22690877158998, -80.84422853576228),
    zoom: 16,
  );

  LatLng _currentLatLng = LatLng(35.22690877158998, -80.84422853576228);
  List latLngList = [LatLng(35.22690877158998, -80.84422853576228)];
  Set _polyline = {
    Polyline(
        polylineId: PolylineId(
            LatLng(35.22690877158998, -80.84422853576228).toString()),
        points: [LatLng(35.22690877158998, -80.84422853576228)])
  };
  Set _markers = {};

  @override
  void initState() {
    super.initState();
  }

  @override
  Widget build(BuildContext context) {
    return Scaffold(
      body: Stack(
        children: [
          GoogleMap(
            mapType: MapType.normal,
            initialCameraPosition: _initialCameraPosition,
            polylines: _polyline,
            markers: _markers,
            onMapCreated: (GoogleMapController controller) {
              _controller.complete(controller);
            },
            zoomControlsEnabled: false,
          ),
          Positioned(
            right: 20,
            bottom: 20,
            child: Column(
              mainAxisAlignment: MainAxisAlignment.start,
              crossAxisAlignment: CrossAxisAlignment.end,
              children: [
                ElevatedButton(
                  style: ElevatedButton.styleFrom(
                    primary: isMoving ? Colors.red : Colors.blue,
                  ),
                  child: Text(isMoving ? 'Stop' : 'Start'),
                  onPressed: () {
                    setState(() {
                      isMoving = !isMoving;
                    });

                    if (isMoving) {
                      randomMovementTimer =
                          Timer.periodic(Duration(seconds: 4), (timer) {
                        _currentLatLng = LatLng(
                            _currentLatLng.latitude + getRandomNumber(),
                            _currentLatLng.longitude + getRandomNumber());
                        updateCameraLocation();
                      });
                    } else {
                      randomMovementTimer?.cancel();
                    }
                  },
                ),
                ElevatedButton(
                  onPressed: _dropMarkerAtCurrentLocation,
                  child: Text('Drop Marker'),
                )
              ],
            ),
          ),
        ],
      ),
    );
  }

  Future updateCameraLocation() async {
    final GoogleMapController controller = await _controller.future;
    latLngList.add(_currentLatLng);

    setState(() {
      _polyline.add(Polyline(
          polylineId: PolylineId(_currentLatLng.toString()),
          points: latLngList,
          width: 2));
    });

    final CameraPosition _newCameraPosition =
        CameraPosition(target: _currentLatLng, zoom: 16);

    controller
        .animateCamera(CameraUpdate.newCameraPosition(_newCameraPosition));
  }

  double getRandomNumber() {
    final random = Random();
    double number = random.nextDouble() / 1000;
    return random.nextBool() ? number : 0 - number;
  }

  void _dropMarkerAtCurrentLocation() {
    setState(() {
      _markers.add(Marker(
        markerId: MarkerId(_currentLatLng.toString()),
        position: _currentLatLng,
        icon: BitmapDescriptor.defaultMarker,
      ));
    });
  }
}
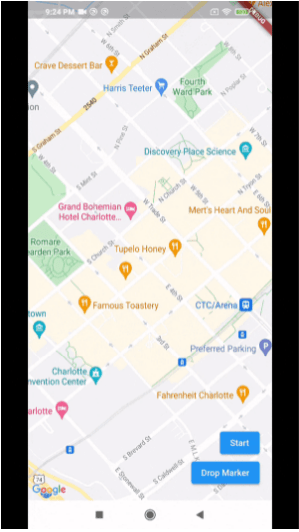
And our final app should look like this:
Conclusion
We have now seen how we can use Google Maps and how relatively simple it is to integrate into an application and develop a UI if need be on top of it. A big question that might arise is the use of the current location of the device. While it is not directly possible within the application, there are still other packages which can provide that info such as the geolocator package or the location package and the values from that can be simply be used at the time of initialization of the map.
Currently the google_maps_flutter package is still not complete in the sense that some of the APIs such as showing heatmaps which are available on the web are not present here. Hopefully the package is still under active development and should eventually reach Flutter.
If you like to start your Mobile App Development project, Hire Android or iOS Developer from Confianz Global INC.
Related posts:
 Biometric Authentication with Flutter
 Mobile App Development agency near charlotte North Carolina (NC),USA
 Mobile Apps For Restaurants – How apps can generate more sales
 Rectangle Detection and Perspective Correction in React Native
 How to Build a Taxi Booking App Like Uber and How Much It Will Cost