


This article explains how to create a module for prestashop. Let’s create a simple module and will name it ‘ My module ’.
First, create a folder for the module in the <HOME_DIRECTORY>/modules folder and it should have the same name as the module, with no space, only alphanumerical characters, the hyphen and the underscore, all in lowercase:
(This will be our folder structure: <HOME_DIRECTORY>/modules/mymodule.)
This folder must contain the main file, a PHP file of the same name as the folder, which will handle most of the processing: mymodule.php
The main mymodule.php file must start with the following test:
<?php
if (!defined(‘_PS_VERSION_’))
exit;
This checks for the existence of an always-existing prestashop constant (its version number), and if it does not exist, it stops the module from loading. The sole purpose of this is to prevent malicious visitors to load this file directly.
The main file (mymodule.php) must contain the module’s main class, and that class must bear the same name as the module and its folder, in CamelCase and that class must extend the Module class, in order to inherit all its methods and attributes. (It can just as well extend any class derived from Module, for specific needs: PaymentModule, ModuleGridEngine, ModuleGraph, etc.)
At this stage, the module can already be seen in the “Modules” page in the back-office (in the “Other modules” section) – albeit with no real name nor thumbnail.
Now, let’s fill the class code block with the essential constructor lines. Our mymodule.php file will look like this now. The use of each attribute in the constructor is explained below.
<?php
if (!defined(‘_PS_VERSION_’))
exit;
class MyModule extends Module
{
public function __construct()
{
$this->name = ‘mymodule’;
$this->tab = ‘front_office_features’;
$this->version = ‘1.0’;
$this->author = ‘Firstname Lastname’;
$this->need_instance = 0;
$this->ps_versions_compliancy = array(‘min’ => ‘1.5’, ‘max’ => ‘1.6’);
parent::__construct();
$this->displayName = $this->l(‘My module’);
$this->description = $this->l(‘Description of my module.’);
$this->confirmUninstall = $this->l(‘Are you sure you want to uninstall?’);
if (!Configuration::get(‘MYMODULE_NAME’))
$this->warning = $this->l(‘No name provided’);
}
}
$this->name: Serves as an internal identifier. The value must be the name of the module’s folder. Do not use special characters or spaces, and keep it lower-case
$this->tab: The title for the section that shall contain this module in the back-office modules list.
$this->version: The version number for the module, displayed in the modules list.
$this->author: Name of author.
$this->need_instance: Indicates whether to load the module’s class when displaying the “Modules” page in the back-office. If set at 0, the module will not be loaded, and therefore will spend less resources to generate the “Modules” page. If your module needs to display a warning message in the “Modules” page, then you must set this attribute to 1.
$this->ps_versions_compliancy: Indicates which version of prestashop this module is compatible with.
parent::__construct(): Call the constructor method from the parent PHP class. By default, this will trigger a lot of actions from PrestaShop. Calling the parent constructor method must be done after the creation of the $this->name variable and before any use of the $this->l() translation method.
$this->displayName: A name for the module, which will be displayed in the back-office’s modules list.
$this->description: A description for the module, which will be displayed in the back-office’s modules list.
$this->confirmUninstall: A message, asking the administrator if he really does want to uninstall the module.
$this->warning: Show any warning messages.
The install() and uninstall() methods
The install() and uninstall() methods make it possible to control what happens when the store administrator installs or uninstalls the module. They must be included in the main class’ block of code (MyModule class) – at the same level as the constructor method.
The install() method basically does all the things when the module is installed. (For example, registering hooks, updating Configuration values, Adding new tables required for the module, etc.)
public function install()
{
if (Shop::isFeatureActive()) {
Shop::setContext(Shop::CONTEXT_ALL);
}
if (!parent::install() ||
!Configuration::updateValue(‘CODE_BLOCK_VALUE’, ‘My code block value’)
) {
return false;
}
return true;
}
The uninstall() method basically does the inverse of install() method. (For example, removing Configuration values which was stored when the module was installed, removing tables, etc.)
public function uninstall()
{
if (!parent::uninstall() ||
!Configuration::deleteByName(‘CODE_BLOCK_VALUE’)
) {
return false;
}
return true;
}
As you can see most of the methods make use of a new Configuration object. This is a PrestaShop-specific object, built to help manage the module settings. It stores these settings in the database without require to use SQL queries. Specifically, this object handles data from the ps_configuration database table.
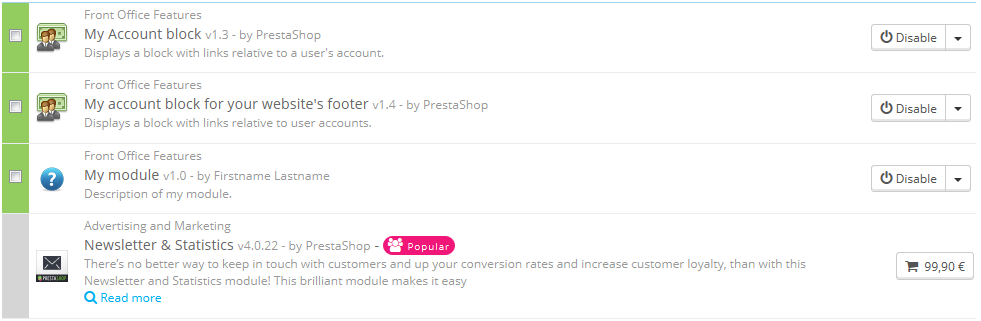
Now that all basics are in place, reload the back-office’s “Modules” pages, in the “Front-office features” section, you should find your module. Install it (or reset it if it is already installed).
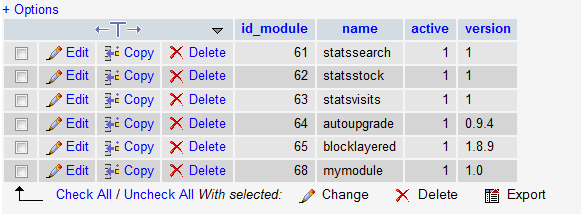
During the module’s installation, PrestaShop automatically creates a small config.xml file in the module’s folder, which stores the configuration information. PrestaShop also adds a row to the ps_module SQL table during the module installation.
We hope this article about Prestashop Module Development was helpful please post your thoughts and comments below .
Confianz Global Inc. is a leading Odoo ERP Development Company in USA. Get in touch with us for Odoo ERP Customization & Implementation. Give us a call today!